
Town Hall 3 starts to get interesting. You can now rebuild the Clan Castle and start seeking out Clans! Notable additions to this Town Hall: the Mortar and the Laboratory. The Mortar adds an absolutely necessary splash damage to your defense and the Laboratory lets you start upgrading your troops. Upgrading your troops quickly is essential to having productive raids.
Defensive Buildings

Resource Buildings

Army Buildings

Other Buildings

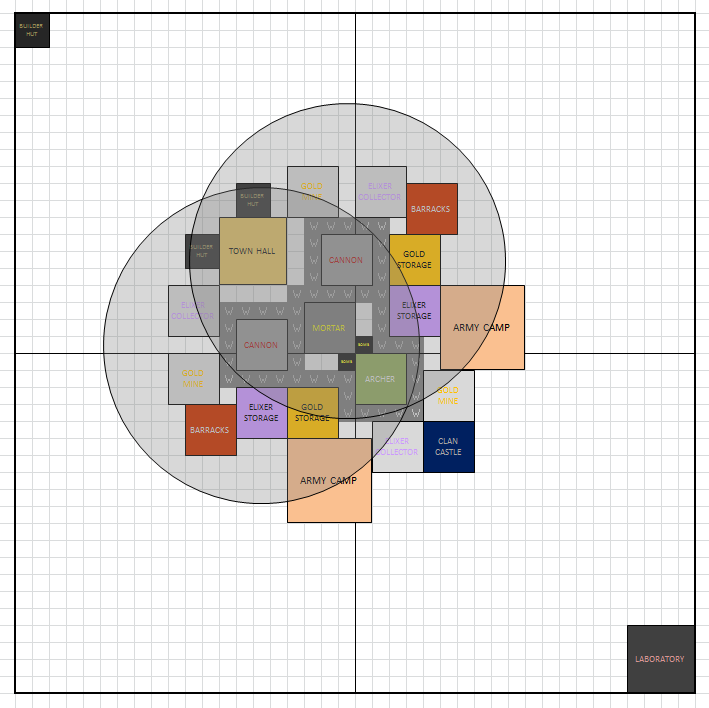
Layout / Base Perimeter
This is really more of a farm base than a Hybrid but I listed it as such because the Town Hall is actually well covered by the other defenses even though it is outside the base walls. For those of you OCD people that didn't like my Town Hall 3 Farming base this one may suit you better. It is perfectly symmetrical along the diagonal.
I've left buildings from the top corner next to the Town Hall because it allows the defenses to attack an Archer that comes into range of the Town Hall. If anything was put there they'd be too far away. The same principle applies to the Army Camp placement. There is a small gap in between that and the Barracks for the Cannon, Archer Tower, and Mortar to reek havoc on troops having to come into range.
Not all of the defenses are boxed in but troops are funneled into two bombs between the Archer Tower and the Mortar. Giants will have to take out the Archer Tower first but the Cannons and Mortar will lower their health. By the time they reach the Mortar the Cannons should be able to finish them off.
It's around this time that I got my third Builder. If you don't have a third you can simply remove the Builder's Hut from the top corner of this layout.

Trap Placement
Bombs don't deal a lot of damage but they work well when placed in close proximity of each other. It also helps when you can funnel troops into them so you know they dish out the most damage.

Mortar Coverage
The Mortar is placed dead center of the base to maximize it's effectiveness. It covers all three of the defenses as well as the Town Hall and storages.

Cannon Coverage
Cannons are placed so they equally distribute protection among the base. They are providing double coverage on the Mortar and Town Hall. I've also placed them in their own walled off boxes so they will be able to shoot for a longer period of time while attacking troops work on the Town Hall and Mortar.
Archer Tower Coverage
The Archer Tower is placed so that it covers the other defenses and storages. It's really a bait defense to pull in Giants so that the other defenses can take them out and to stay away from the Town Hall.

Clan Castle Reinforcements
Ah, the Clan Castle! This is probably one of the most underestimated of your defenses. It is imperative that you join a Clan (give Shucked a shout!) so that you can always have reinforcements if you're attacked. You can see that the Clan Castle covers a lot of area in your base. I tend to stick it near the middle of the base or close to my Town Hall for extra protection. The basic idea is that the Clan Castle troops become an annoyance. While the attacker is trying to get rid of them your defenses, your donated troops are killing the attacker's troops off faster. The attacker will also have to use more of their army to get rid of the Clan Caste troops. This means less troops to attack the rest of your base.
This is a little less centralized than I normally would put the Clan Castle but I didn't wanted something to force the attacker to place troops further out so the Archer Tower would have longer to take them down. Otherwise it still covers the Mortar and half of the storages.
This is a little less centralized than I normally would put the Clan Castle but I didn't wanted something to force the attacker to place troops further out so the Archer Tower would have longer to take them down. Otherwise it still covers the Mortar and half of the storages.

No comments:
Post a Comment